
Introduction
Separation of concern is key to achieving a neat and loosely
coupled solution. This entails separating the data access logic and queries,
from the business logic. One very important strategy for achieving this is the
use of the repository pattern. Hence, this article covers the basics of
implementing a repository pattern with dependency injection.
Download Complete Source Code.
Download Complete Source Code.
Prerequisites
The sample project and the examples were developed using the
following tools
·
Visual Studio 2017
·
Microsoft SQL Server
Overview of
the Repository Pattern
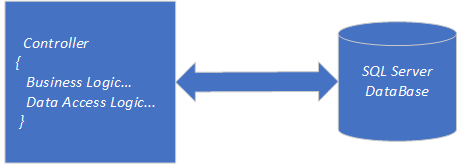
Data-driven applications need to access data stored in a
database or other storage device. The simplest way to achieve this is to
incorporate all the data access logic in the application logic. That is, all
the data access codes are written in the main application code. This approach makes
the solution to be tightly coupled and also, a direct connection is made with the
physical database. Each time the data access logic is to be modified, the
business logic is as well modified.
Another
approach is the use of Entity framework. This creates a layer on top of the
physical database. The application logic uses the entity framework context to
perform its CRUD (Create, Retrieve, Update and Delete) operations. This
approach eliminates any direct connection between the application logic and the
database.
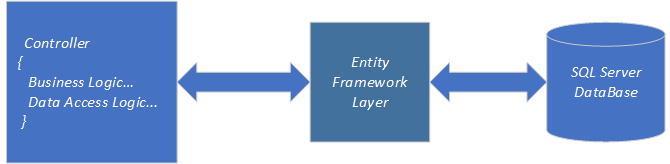
With this approach, the solution is still tightly coupled
because the data-access logic is still part of the main application logic. If
we try to isolate the main application, it will break the entire solution. Also, any changes to the data-access logic will affect the application logic.
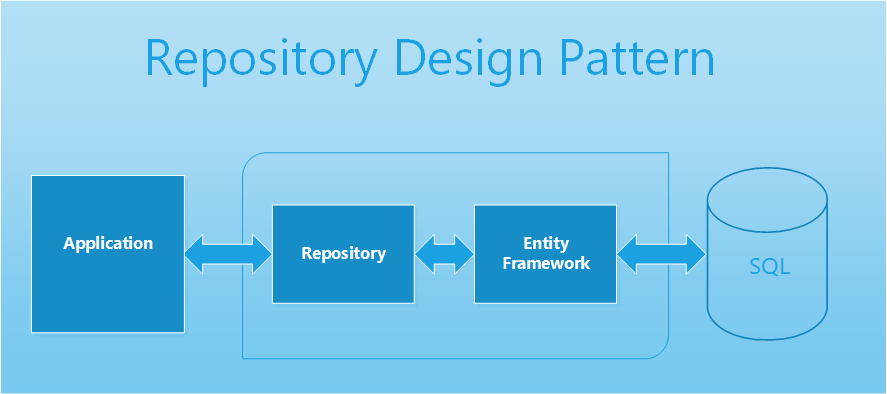
Repository pattern eliminates the above problems, with
repository pattern, you can completely isolate the business logic from the
data-access logic. This gives you a loosely coupled solution which can be
decoupled without breaking the solution. Also, any change made to the
data-access logic will not affect the application logic.

Case
Scenario
We are going to use customer data (basic information) as a
case study. We will create a sample database and add the customer table. Next, we
will add the customer model to our solution by database first approach using
Ado.Net and entity framework. Next, we will create customer interface, create
customer repository, and add dependency injection by installing Ninject for MVC
from nugget package manager. Finally, we will create a custom controller.
Create the
Project
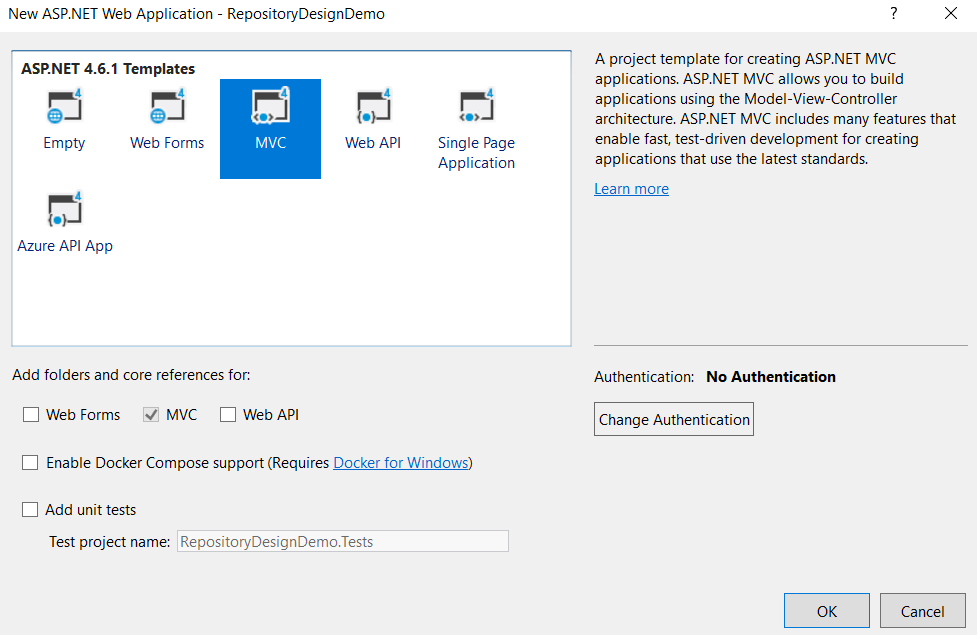
Lunch visual studio > create new project > select
asp.net web application.
Give the solution an appropriate name then click Ok. On the
pop-up dialog, select MVC then click OK and wait for visual studio to complete
the process.
Create Data
Access Layer
Right click on the Solution > select Add > New Project.
On the popup dialog select Class Library and click ok. Wait for visual studio to
complete the process.

Delete
the Class1.cs file added by the visual studio.
Create
Sample Database
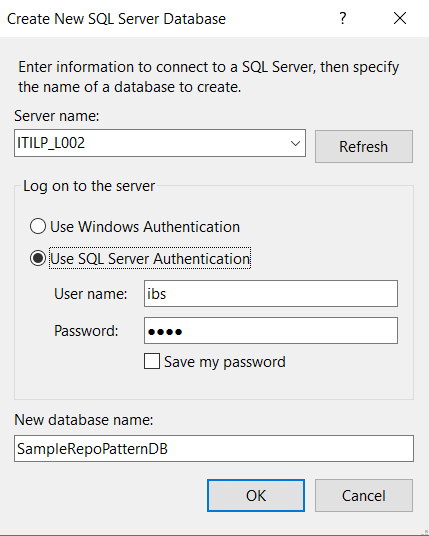
On the server explorer, Right click on the Data Connection
> Select Create New SQL Server Database. Input the SQL server instance name,
select use SQL Server Authentication option and input the username and
password. Input the name of the new
database to be created then click ok and wait for visual studio to complete the
operation.
Now let us add the customer table.
Expand the new database created in the server explorer, right
click on the Tables > select Add New Table. Modified the table entities like:
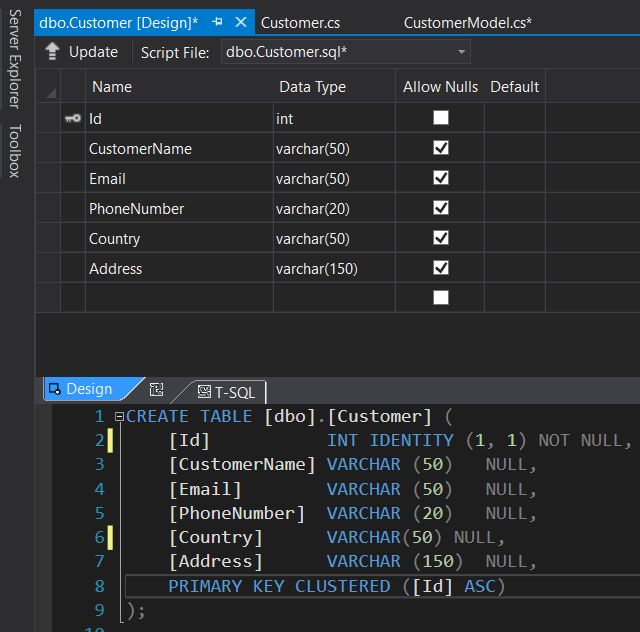
Make sure the Id is set as primary key and as an identity.
Click on the update button then select update database and
wait for the visual studio to complete the process.
Next,
we are going to add a customer data model to the solution using Ado.net. To
achieve this, right-click on the DataAccessLayer Project > select Add >
New Item. Select Ado.Net Entity Model, name your model and click Add. On the
next dialog, select EF Designer from Database and click on next. Select the
database we created and click on next.
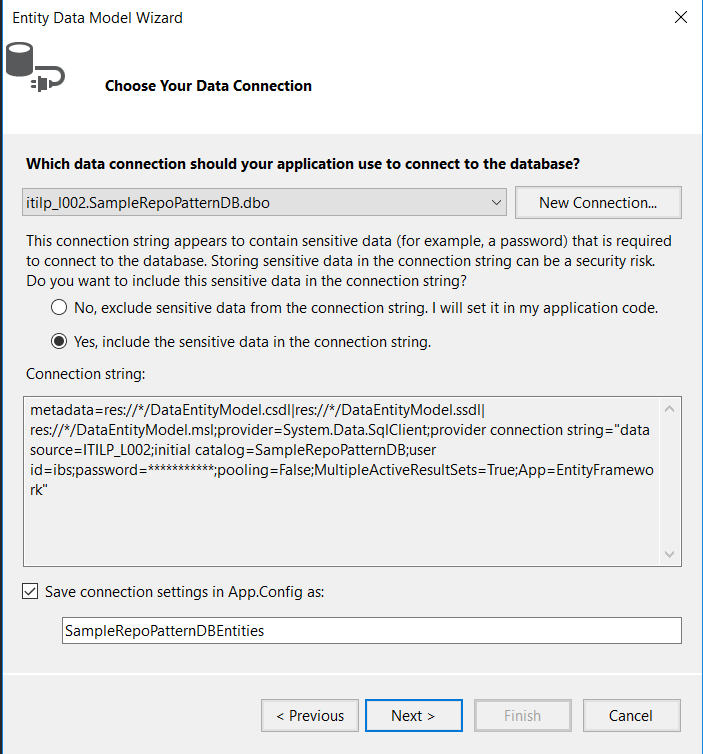
On the Next dialog, select Entity framework 6x and click on
next. Chose the customer table and click on finish. Wait for the visual studio
to complete the operation and Build the solution.
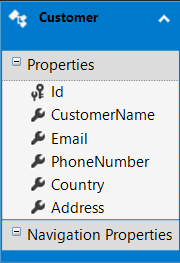
The customer entity added like so:
Create the
Custom Models
Right click on the solution > Add > select New Project.
On the popup dialog select Class Library, and name it DataAccessLayer.Models.
Delete the class1.cs generated by the visual studio.
To add customer model, right click on the
DataAccessLayer.Models project > Add > Class. Name the class
CustomerModel.cs like:
using System;
using System.Collections.Generic;
using System.Linq;
using System.Text;
using System.Threading.Tasks;

namespace DataAccessLayer.Models
{
    public class CustomerModel
    {
        public int CustomerId { get; set; }
        public string CustomerName { get; set; }
        public string CustomerEmail { get; set; }
        public string Phone_Number { get; set; }
        public string CustomerCountry { get; set; }
        public string CustomerAddress { get; set; }
    }
}
Create the
Customer Interface
Right click on the solution > Add > select New Project.
On the popup dialog select Class Library, and name it DataAccessLayer.Interface.
Delete the class1.cs generated by the visual studio.
Next,
create ICustomerRepository Interface like this:
    public interface ICustomerRepository
     {
        IQueryable<customermodel> GetCustomers();
        CustomerModel GetCustomer(int Id);
        bool InsertCustomer(CustomerModel model);
        void UpdateCustomer(CustomerModel model);
        void DeleteCustomer(int Id);
     }
Create the
Customer Repository
We added ICustomerRepository with five methods, these methods
will be implemented by Customer Repository. Before we create a Customer
repository, let’s create a generic repository that implements the entity
datacontext class.
First, Right-click on the solution > Add > New Project.
From the dialog, select Class library and name it DataAccessLayer.Repository.
Install Entity framework 6.2.0 using a nuget package manager.
Next, add generic BaseRepository like so:
using System;
using System.Collections.Generic;
using System.Data.Entity;
using System.Linq;
using System.Text;
using System.Threading.Tasks;

namespace DataAccessLayer.Repository
{
    public class BaseRepository<c> : IDisposable
       where C : DbContext, new()
     {
        private C _DataContext;

        public virtual C DataContext
        {
            get
            {
                if (_DataContext == null)
                {
                    _DataContext = new C();

                    this.AllowSerialization = true;

                }
                return _DataContext;
            }
        }

        public virtual bool AllowSerialization
        {
            get
            {
                return _DataContext.Configuration.ProxyCreationEnabled;
            }
            set
            {
                _DataContext.Configuration.ProxyCreationEnabled = !value;
            }
        }

        public void Dispose()
        {
            if (DataContext != null) DataContext.Dispose();
        }
    }
}
Next, we add Customer repository to the repository project
like so:
using DataAccessLayer.Interface;
using DataAccessLayer.Models;
using System;
using System.Collections.Generic;
using System.Linq;
using System.Text;
using System.Threading.Tasks;

namespace DataAccessLayer.Repository
{
    public class CustomerRepository : BaseRepository<samplerepopatterndbentities>, ICustomerRepository
    {
          public IQueryable<customermodel> GetCustomers()
        {
            throw new NotImplementedException();
        }
        public CustomerModel GetCustomer(int Id)
        {
            throw new NotImplementedException();
        }
        public bool InsertCustomer(CustomerModel model)
        {
            throw new NotImplementedException();
        }
        public void UpdateCustomer(CustomerModel model)
        {
            throw new NotImplementedException();
        }
        public void DeleteCustomer(int Id)
        {
            throw new NotImplementedException();
        }

    }
}
Note that after creating CustomerRepository, we added DataAccessLayer, DataAccessLayer.Models and DataAccessLayer.Interface project reference.
CustomerReposiotry inherited from BaseRepository and ICustomerInterface.
BaseRepository is generic therefore we passed SampleRepoPatternDBEntities context class as type.
Let us now modify the customer repository methods like so:
BaseRepository is generic therefore we passed SampleRepoPatternDBEntities context class as type.
Let us now modify the customer repository methods like so:
public class CustomerRepository : BaseRepository<samplerepopatterndbentities>, ICustomerRepository
    {
        public IQueryable<customermodel> GetCustomers()
        {
            return DataContext.Customers.Select(model =>  new CustomerModel()
            {
                CustomerId=model.Id,
                CustomerAddress=model.Address,
                CustomerCountry=model.Country,
                CustomerEmail=model.Email,
                CustomerName=model.CustomerName,
                Phone_Number=model.PhoneNumber
            });
        }
        public CustomerModel GetCustomer(int Id)
        {
            return DataContext.Customers.Select(model => new CustomerModel()
            {
                CustomerId = model.Id,
                CustomerAddress = model.Address,
                CustomerCountry = model.Country,
                CustomerEmail = model.Email,
                CustomerName = model.CustomerName,
                Phone_Number = model.PhoneNumber
            }).FirstOrDefault(m=>m.CustomerId==Id);
        }
        public bool InsertCustomer(CustomerModel model)
        {
            var customer = new Customer()
            {
                Id = model.CustomerId,
                Address = model.CustomerAddress,
                Country = model.CustomerCountry,
                Email = model.CustomerEmail,
                CustomerName = model.CustomerName,
                PhoneNumber = model.Phone_Number
            };
            DataContext.Customers.Add(customer);
            return DataContext.SaveChanges() > 0;
        }
        public void UpdateCustomer(CustomerModel model)
        {
            var customer = DataContext.Customers.Find(model.CustomerId);
            if (customer!=null)
            {
                customer.Address = model.CustomerAddress;
                customer.Country = model.CustomerCountry;
                customer.Email = model.CustomerEmail;
                customer.PhoneNumber = model.Phone_Number;
                customer.CustomerName = model.CustomerName;
                DataContext.Entry(customer).State = EntityState.Modified;
                DataContext.SaveChanges();
            }
        }
        public void DeleteCustomer(int Id)
        {
            var customer = DataContext.Customers.Find(Id);
            DataContext.Customers.Remove(customer);
            DataContext.SaveChanges();
        }

    }
Add dependency
injection
Next, let’s add a dependency injection. We start by installing
Ninject for MVC4 on the main project using nuget package manager. Open the
nugget manager and search for ninject.mvc4 by Remo Gloor. Install the latest
version. Once the installation is done, build the solution.
On the main project, expand the App_Start folder and click on
the NinjectWebCommon.cs. Go to the RegisterServices method and add all the bindings
like so:
private static void RegisterServices(IKernel kernel)
{
kernel.Bind<icustomerrepository>().To<customerrepository>();
}
Create customer Controller and inject all dependencies like
so:
using  DataAccessLayer.Interface;
using System;
using System.Collections.Generic;
using System.Linq;
using System.Web;
using System.Web.Mvc;

namespace RepositoryDesignDemo.Controllers
{
    public class CustomerController : Controller
    {
        ICustomerRepository repo;
        public CustomerController(ICustomerRepository _repo)
        {
            this.repo = _repo;
        }
        // GET: Customer
        public ActionResult Index()
        {
            return View();
        }
    }
}
Create Customer
View
Let us now add sample customer view to perform CRUD
operations by utilizing the repository design pattern we created.
On the customer
controller, right-click the index and add view. Modify the index view like so:
@{
   ViewBag.Title = "Customer";
}
<h2>
    Customer
</h2>
<div class="row">
<div class="col-md-12">
<button class="btn btn-primary pull-right" id="btnNewCustomer">Add Customer</button>
 <br />
   @{
     int counter = 1;
    }
   @foreach (var item in ViewBag.customers)
   {
     counter++;
   }
<br />
<table class="table table-bordered table-striped table-condensed">
  <thead>
<tr>
   <th>S/N</th>
    <th>Name</th>
    <th>Email</th>
     <th>Country</th>
     <th>#</th>
   </tr>
</thead>
  <tbody>
<tr>
 <td>@counter</td>
 <td>@item.CustomerName</td>
 <td>@item.CustomerEmail</td>
  <td>@item.CustomerCountry</td>
 <td><button class="btn btn-xs btn-primary" data-id="@item.CustomerId" id="btnview">view</button>|<button class="btn btn-xs btn-primary" data-id="@item.CustomerId" id="btnedit">edit</button>|<button class="btn btn-xs btn-danger" data-id="@item.CustomerId" id="btndel">delete</button></td>
</tr>
</tbody>
 </table>
</div>
</div>
<div class="modal fade" data-backdrop="static" id="customerModal" role="dialog" tabindex="-1">
<div class="modal-dialog modal-lg">
<div class="modal-content">
<div class="modal-header">
<button aria-hidden="true" class="close modalClose" type="button">×</button>
 <br />
<h2 class="modal-title text-red">
  Customer
</h2>
</div>
<div class="modal-body">
<div class="row">
<div class="col-md-12">
<div class="form-horizontal">
<div class="form-group">
<label class="control-label col-md-2">ID</label>
 <br />
<div class="col-md-2">
<input class="form-control" disabled="" id="CustomerId" name="CustomerId" type="text" value="0" />
</div>
</div>
<div class="form-group">
<label class="control-label col-md-2">Name</label>
<br />
<div class="col-md-3">
<input class="form-control" id="CustomerName" name="CustomerName" type="text" />
</div>
</div>
<div class="form-group">
<label class="control-label col-md-2">Email</label>
<br />
<div class="col-md-3">
<input class="form-control" id="CustomerEmail" name="CustomerEmail" type="text" />
</div>
</div>
<div class="form-group">
<label class="control-label col-md-2">Phone Number</label>
<br />
<div class="col-md-3">
<input class="form-control" id="Phone_Number" name="Phone_Number" type="text" />
</div>
</div>
<div class="form-group">
<label class="control-label col-md-2">Country</label>
 <br />
<div class="col-md-3">
<input class="form-control" id="CustomerCountry" name="CustomerCountry" type="text" />
  </div>
</div>
<div class="form-group">
<label class="control-label col-md-2">Address</label>
  <br />
<div class="col-md-4">
<input class="form-control" id="CustomerAddress" name="CustomerAddress" type="text" />
 </div>
</div>
</div>
</div>
</div>
</div>
<div class="modal-footer ">
<div class="row">
<div class="col-md-12">
<div class="btn-group pull-right">
<button class="btn btn-default btn-primary" id="btnSave"> Save</button>
<button class="btn btn-default modalClose btn-danger">
 <i class="fa fa-times"></i> Close</button>
</div>
</div>
</div>
</div>
</div>
<!-- / .modal-content -->
    </div>
<!-- / .modal-dialog -->
</div>
<!-- / .modal -->
@section Scripts{
    <script>
        $(function () {
            $("#btnNewCustomer").on("click", function (e) {
                e.preventDefault();
                $("#customerModal").modal("show");
            });
            $(".modalClose").on("click", function (e) {
                e.preventDefault();
                $("#customerModal").modal("hide");
                resetModal();
            });
            $("#btnSave").on("click", function (e) {
                e.preventDefault();
                newCustomer();
            });
            $("#btnview").on("click", function (e) {
                e.preventDefault();
                $("#btnSave").prop("disabled", true);
                let id = $(this).attr("data-id");
                getCustomer(id);

            });
            $("#btnedit").on("click", function (e) {
                e.preventDefault();
                let id=  $(this).attr("data-id");
                getCustomer(id);
            });
            $("#btndel").on("click", function (e) {
                e.preventDefault();
                let id = $(this).attr("data-id");
                deleteCustomer(id);
            });

        });
        function resetModal()
        {
            $("#CustomerId").val("0");
            $("#CustomerName").val(null);
            $("#CustomerEmail").val(null);
            $("#Phone_Number").val("0");
            $("#CustomerCountry").val("0");
            $("#CustomerAddress").val("0");
            $("#btnSave").prop("disabled", false);
        }
        function getCustomerData() {
            data = {
                CustomerId: $("#CustomerId").val(),
                CustomerName: $("#CustomerName").val(),
                CustomerEmail: $("#CustomerEmail").val(),
                Phone_Number: $("#Phone_Number").val(),
                CustomerCountry: $("#CustomerCountry").val(),
                CustomerAddress: $("#CustomerAddress").val(),
            };
            return data;
        }
        function newCustomer()
        {
            $.ajax({
                type: 'post',
                url: '@Url.Action("AddCustomer", "Customer")',
                data: getCustomerData(),
                success: function (data) {
                    if (data != "0") {
                        alert(data);
                    } else {
                        window.location.reload();
                    }
                },
                error: function () {
                    alert("oops! Something went wrong");
                }

            });
        }
         function getCustomer(id)
          {
               $.ajax({
                   type: 'post',
                   url: '@Url.Action("GetCustomer", "Customer")',
                   data: { id: id},
                  success: function (data) {
                      $("#CustomerId").val(data.CustomerId);
                      $("#CustomerName").val(data.CustomerName);
                      $("#CustomerEmail").val(data.CustomerEmail);
                      $("#Phone_Number").val(data.Phone_Number);
                      $("#CustomerCountry").val(data.CustomerCountry);
                      $("#CustomerAddress").val(data.CustomerAddress);
                      $("#customerModal").modal("show");
                  },
                  error: function () {
                      alert("oops! Something went wrong");
                  }

              });
        }
         function deleteCustomer(id)
          {
               $.ajax({
                   type: 'post',
                   url: '@Url.Action("DeleteCustomer", "Customer")',
                   data: { id: id},
                  success: function (data) {
                      if (data != "0") {
                          alert(data);
                      } else {
                          window.location.reload();
                      }
                  },
                  error: function () {
                      alert("oops! Something went wrong");
                  }

              });
          }
    </script>
}
Also, edit the Customer controller like so:
using DataAccessLayer.Interface;
using DataAccessLayer.Models;
using System;
using System.Collections.Generic;
using System.Linq;
using System.Web;
using System.Web.Mvc;

namespace RepositoryDesignDemo.Controllers
{
    public class CustomerController : Controller
    {
        ICustomerRepository repo;
        public CustomerController(ICustomerRepository _repo)
        {
            this.repo = _repo;
        }
        // GET: Customer
        public ActionResult Index()
        {
            ViewBag.customers = repo.GetCustomers().ToList();
            return View();
        }
        public JsonResult AddCustomer(CustomerModel model)
        {
            string res = "0";
            try {
                if (model.CustomerId > 0)
                {
                    repo.UpdateCustomer(model);
                }
                else
                {
                    repo.InsertCustomer(model);
                }
            }
            catch(Exception ex)
            {
                res = ex.InnerException != null ?
                    ex.InnerException.Message :
                    (string.IsNullOrEmpty(ex.Message)
                    ? " An Error occured"
                    : ex.Message);
            }
            return Json(res,JsonRequestBehavior.AllowGet);
        }
        public JsonResult GetCustomer(int id)
        {
            var data = new CustomerModel();
            try
            {
                data = repo.GetCustomer(id);
            }
            catch
            {

            }
            return Json(data, JsonRequestBehavior.AllowGet);
        }
        public JsonResult DeleteCustomer(int id)
        {
            var res = "0";
            try
            {
                repo.DeleteCustomer(id);
            }
            catch (Exception ex)
            {
                res = ex.InnerException != null ?
                    ex.InnerException.Message :
                    (string.IsNullOrEmpty(ex.Message)
                    ? " An Error occured"
                    : ex.Message);
            }
            return Json(res, JsonRequestBehavior.AllowGet);
        }
    }
}
Install the entity framework in the main project using the nuget package
manager. Copy connection string from app config in DataAccessLayer and add it to web config in the main project. Build and run the solution.
Using Repository Pattern and Dependency Injection with ASP.NET MVC and Entity Framework
 Reviewed by Akintunde Toba
on
May 29, 2019
Rating:
Reviewed by Akintunde Toba
on
May 29, 2019
Rating:
Reviewed by Akintunde Toba
on
May 29, 2019
Rating:


Please consider adding instruction on how to get the code sample to actually run. I assume something needs to be done with respect to the sql server connection and setup.
ReplyDeleteThank you for your feedback, the link for downloading source code is available in the write-up. however, you can get it here https://github.com/thurbarh/Repository-Design-Pattern-with-Ninject4MVC
DeleteYour blog has chock-a-block of useful information. I liked your blog's content as well as its look. In my opinion, this is a perfect blog in all aspects. advanced aesthetic injection training
ReplyDeleteWhen you use a genuine service, you will be able to provide instructions, share materials and choose the formatting style. med spa jobs
ReplyDelete