
In the previous tutorial, we were able to implement student creation functionality. You can follow the previous tutorial in this series:
- Implementing CRUD Operation With Entity Framework in Asp.net MVC
- Implementing CRUD Operation With Entity Framework in Asp.net MVC Part II
In this tutorial, we are going to focus on adding a view, edit and delete functionality to the project. In case you have any question you can use the comment section or use the contact form to submit your question.
Download Complete Source Code
View Record
On the student controller, add the following method
public ActionResult ViewStudent(int id=0)
        {
            var model = new StudentViewModel();
            var data = dbContext.Students.Find(id);
            if (data != null)
            {
                model.Address_Line1 = data.AddressLine1;
                model.Address_Line2 = data.AddressLine2;
                model.Phone_Number = data.PhoneNumber;
                model.Student_Age = data.Age;
                model.Student_DOB = data.DOB;
                model.Student_Email = data.Email;
                model.Student_Id = data.Id;
                model.Student_Name = data.Name;
            }
            return View(model);
        }
Right-click on the method name, on the popup dialog, select add view and wait for the visual studio to complete the process.
Modify the generated view page as follow:
Modify the generated view page as follow:
@model MVCSampleCRUDOperation.Models.StudentViewModel
@{
ViewBag.Title = "ViewStudent";
Layout = "~/Views/Shared/_Layout.cshtml";
}
<h2>
View Student</h2>
<div class="row">
<div class="form-horizontal">
<div class="form-group">
<label class="control-label col-md-2"> Full Name</label>
<br />
<div class="col-md-3">
@Html.TextBoxFor(model => model.Student_Name, new { placeholder = "Full Name", @class = "form-control" })
</div>
</div>
<div class="form-group">
<label class="control-label col-md-2">Email</label>
<br />
<div class="col-md-3">
@Html.TextBoxFor(model => model.Student_Email, new { placeholder = "Email", @class = "form-control" })
</div>
</div>
<div class="form-group">
<label class="control-label col-md-2">Mobile</label>
<br />
<div class="col-md-3">
@Html.TextBoxFor(model => model.Phone_Number, new { placeholder = "Phone Number", @class = "form-control" })
</div>
</div>
<div class="form-group">
<label class="control-label col-md-2">Date of Birth</label>
<br />
<div class="col-md-3">
@Html.TextBoxFor(model => model.Student_DOB, new { placeholder = "Date of Birth [mm/dd/yyyy]", @class = "form-control" })
</div>
</div>
<div class="form-group">
<label class="control-label col-md-2">Address
</label>
<br />
<div class="col-md-3">
@Html.TextBoxFor(model => model.Address_Line1, new { placeholder = "Line 1", @class = "form-control" })
</div>
</div>
<div class="form-group">
<div class="col-md-3 col-md-offset-2">
@Html.TextBoxFor(model => model.Address_Line2, new { placeholder = "Line 2", @class = "form-control" })
</div>
</div>
<div class="form-group">
<div class="col-md-3 col-md-offset-2">
<a class="btn btn-danger btn-sm" href="https://www.blogger.com/~/Student/index">Close</a>
</div>
</div>
</div>
</div>
On the index page, we are going to add onclick event to the view button. Also, we will add a form to be submitted whenever the view button is click.
Modify the index page as shown:
@model IEnumerable <mvcsamplecrudoperation.models.studentviewmodel="">
@{
    ViewBag.Title = "Index";
    Layout = "~/Views/Shared/_Layout.cshtml";
}
<div class="row">
<h3>
  Students
 </h3>
</div>
<div class="row" style="padding-bottom: 5px;">
<a class="btn btn-primary pull-right" href="https://www.blogger.com/~/Student/CreateStudent">New Student</a>
</div>
<div class="row">
@{
     int i = 1;
 }
 @foreach (var item in Model)
 {
   i++;
 }
 <br />
<table class="table table-striped table-responsive table-bordered">
 <thead>
<tr>
 <th>S/N</th>
  <th>Name</th>
  <th>Email</th>
  <th>Phone Number</th>
  <th>Date of Birth</th>
   <th>Address</th>
   <th>Actions</th>
   </tr>
  </thead>
    <tbody>
   <tr>
    <td>@i</td>
    <td>@item.Student_Name</td>
     <td>@item.Student_Email</td>
    <td>@item.Phone_Number</td>
    <td>@item.Student_DOB.Value.ToString("dd-MM-yyyy")</td>
    <td>@item.Address_Line1</td>
    td><button class="btn btn-xs btn-primary" onclick="viewStudentfn('@item.Student_Id')">view</button>|<button class="btn btn-xs btn-success">edit</button>|<button class="btn btn-xs btn-danger">delete</button></td>
 </tr>
</tbody>
    </table>
</div>
<div>
@using (Html.BeginForm("ViewStudent", "student", FormMethod.Post, new { @class = "form-horizontal", id = "viewStudentForm" }))
    {
      <input id="student_view_id" name="id" type="hidden" />
    }
</div>
@section Scripts{
    <script>
        function viewStudentfn(id) {
            $("#student_view_id").val(id);
            $("#viewStudentForm").submit();
        }
    </script>
}
Note that the student Id was passed via the request body using form submit. In most scenario, the Id is always sent as part of the URL. Wrapping the Id as part of request body is cleaner and safer because the Id is not in any way exposed in the URL.
On click of the view button, JavaScript function viewStudentfn is called. The function saves the student id in a hidden input field and calls the submit method.
Save all changes made, build and run the solution. Click on the view button on any of the students.


Take note of the URL, the student Id is not part of the URL, the Id was sent as part of the request body.
Edit Record
Let us now add the edit functionality to the project. The edit page will look exactly like the create page we added in part two of this tutorial except that we are going to add a hidden field to hold the student Id.
Add the following method to the student controller
public ActionResult EditStudent(int id = 0)
        {
            var model = new StudentViewModel();
            var data = dbContext.Students.Find(id);
            if (data != null)
            {
                model.Address_Line1 = data.AddressLine1;
                model.Address_Line2 = data.AddressLine2;
                model.Phone_Number = data.PhoneNumber;
                model.Student_Age = data.Age;
                model.Student_DOB = data.DOB;
                model.Student_Email = data.Email;
                model.Student_Id = data.Id;
                model.Student_Name = data.Name;
            }
            return View(model);
        }
Right-Click on the method name and select add view. Wait for the visual studio to complete the process. Modify the edit page as following:
@model MVCSampleCRUDOperation.Models.StudentViewModel
@{
ViewBag.Title = "Edit Student";
Layout = "~/Views/Shared/_Layout.cshtml";
}
<h2>
Edit Student
</h2>
<div class="row">
@using (Html.BeginForm("Edit_student", "student", FormMethod.Post, new { @class = "form-horizontal", id = "editStudentForm" }))
{
<br />
<div class="form-group">
<div class="col-md-10 col-md-offset-2" style="color: red;">
@Html.ValidationSummary()
</div>
</div>
@Html.HiddenFor(model = > model.Student_Id)
<br />
<div class="form-group">
<label class="control-label col-md-2">
Full Name
</label>
<br />
<div class="col-md-3">
@Html.TextBoxFor(model = > model.Student_Name, new { placeholder = "Full Name", @class = "form-control" })
</div>
</div>
<div class="form-group">
<label class="control-label col-md-2">
Email
</label>
<br />
<div class="col-md-3">
@Html.TextBoxFor(model = > model.Student_Email, new { placeholder = "Email", @class = "form-control" })
</div>
</div>
<div class="form-group">
<label class="control-label col-md-2">
Mobile
</label>
<br />
<div class="col-md-3">
@Html.TextBoxFor(model = > model.Phone_Number, new { placeholder = "Phone Number", @class = "form-control" })
</div>
</div>
<div class="form-group">
<label class="control-label col-md-2">
Date of Birth
</label>
<br />
<div class="col-md-3">
@Html.TextBoxFor(model = > model.Student_DOB, new { placeholder = "Date of Birth [mm/dd/yyyy]", @class = "form-control" })
</div>
</div>
<div class="form-group">
<label class="control-label col-md-2">
Address
</label>
<br />
<div class="col-md-3">
@Html.TextBoxFor(model = > model.Address_Line1, new { placeholder = "Line 1", @class = "form-control" })
</div>
</div>
<div class="form-group">
<div class="col-md-3 col-md-offset-2">
@Html.TextBoxFor(model = > model.Address_Line2, new { placeholder = "Line 2", @class = "form-control" })
</div>
</div>
<div class="form-group">
<div class="col-md-3 col-md-offset-2">
<button class="btn btn-primary btn-sm" id="btnAdd" type="submit">Update</button>
<a class="btn btn-danger btn-sm" href="https://www.blogger.com/~/Student/index">Close</a>
</div>
</div>
}
</div>
On the student controller, add the following method
public ActionResult edit_student(StudentViewModel model)
        {
            try
            {

                var student = dbContext.Students.Find(model.Student_Id);
                if (student != null)
                {
                    student.Name = model.Student_Name;
                    student.PhoneNumber = model.Phone_Number;
                    student.DOB = model.Student_DOB;
                    student.Email = model.Student_Email;
                    student.AddressLine1 = model.Address_Line1;
                    student.AddressLine2 = model.Address_Line2;
                    student.Age = DateTime.Now.Subtract(model.Student_DOB.Value).Days;

                    dbContext.SaveChanges();
                    return RedirectToAction("Index");
                }
            }
            catch (Exception ex)
            {
                ModelState.AddModelError("", $"Error {ex?.Message}");
                return View("EditStudent", model);
            }
            ModelState.AddModelError("", "Error occurred while saving record, please try again");
            return View("EditStudent", model);
        }
Go to the index page, modify the edit button as follows:
<button class="btn btn-xs btn-success" onclick="editStudentfn('@item.Student_Id')">edit</button>
Add form with a hidden input field to be submitted when edit button is clicked as follows:
@using (Html.BeginForm("EditStudent", "student", FormMethod.Post, new { @class = "form-horizontal", id = "editStudentForm" }))
    {
        <input id="student_edit_id" name="id" type="hidden" />
    }
Add the following function to the javascript:
function editStudentfn(id) {
        $("#student_edit_id").val(id);
        $("#editStudentForm").submit();
    }
After modifying the index page, the page should be as follows:
@model IEnumerable <mvcsamplecrudoperation.models.studentviewmodel="">
@{
    ViewBag.Title = "Index";
    Layout = "~/Views/Shared/_Layout.cshtml";
}

<div class="row">
<h3>
        Students
    </h3>
</div>
<div class="row" style="padding-bottom: 5px;">
<a class="btn btn-primary pull-right" href="https://www.blogger.com/~/Student/CreateStudent">New Student</a>
</div>
<div class="row">
@{
        int i = 1;
    }
    @foreach (var item in Model)
    {

        i++;
    }
    <br />
<table class="table table-striped table-responsive table-bordered">
        <thead>
<tr>
                <th>S/N</th>
                <th>Name</th>
                <th>Email</th>
                <th>Phone Number</th>
                <th>Date of Birth</th>
                <th>Address</th>
                <th>Actions</th>
            </tr>
</thead>
        <tbody>
<tr>
                <td>@i</td>
                <td>@item.Student_Name</td>
                <td>@item.Student_Email</td>
                <td>@item.Phone_Number</td>
                <td>@item.Student_DOB.Value.ToString("dd-MM-yyyy")</td>
                <td>@item.Address_Line1</td>
                <td><button class="btn btn-xs btn-primary" onclick="viewStudentfn('@item.Student_Id')">view</button>|<button class="btn btn-xs btn-success" onclick="editStudentfn('@item.Student_Id')">edit</button>|<button class="btn btn-xs btn-danger">delete</button></td>
            </tr>
</tbody>
    </table>
</div>
<div>
@using (Html.BeginForm("ViewStudent", "student", FormMethod.Post, new { @class = "form-horizontal", id = "viewStudentForm" }))
    {
        <input id="student_view_id" name="id" type="hidden" />
    }
    @using (Html.BeginForm("EditStudent", "student", FormMethod.Post, new { @class = "form-horizontal", id = "editStudentForm" }))
    {
        <input id="student_edit_id" name="id" type="hidden" />
    }
</div>
@section Scripts{
    <script>
        function viewStudentfn(id) {
            $("#student_view_id").val(id);
            $("#viewStudentForm").submit();
        }
        function editStudentfn(id) {
            $("#student_edit_id").val(id);
            $("#editStudentForm").submit();
        }
    </script>
}
Save all the changes, build and run the project, you should have the following.

You should note that we have a clean URL because we are not sending Id through the URL.

Modify any of the information and click the update button.
Delete Record
Modify the delete button in the index page
Add delete method to be called to the student controller
public ActionResult DeleteStudent(int id = 0)
        {
            var model = new StudentViewModel();
            var data = dbContext.Students.Find(id);
            dbContext.Students.Remove(data);
            dbContext.SaveChanges();
            return RedirectToAction ("Index");
        }
Add form with a hidden input field to be submitted whenever the delete button is click
@using (Html.BeginForm("DeleteStudent", "student", FormMethod.Post, new { @class = "form-horizontal", id = "deleteStudentForm" }))
    {
        <input id="student_delete_id" name="id" type="hidden" />
    }
Modify the JavaScript on the page and add delete function to the script as shown
function deleteStudentfn(id,name) {
        $("#student_delete_id").val(id);
        $("#deleteStudentForm").submit();
    }
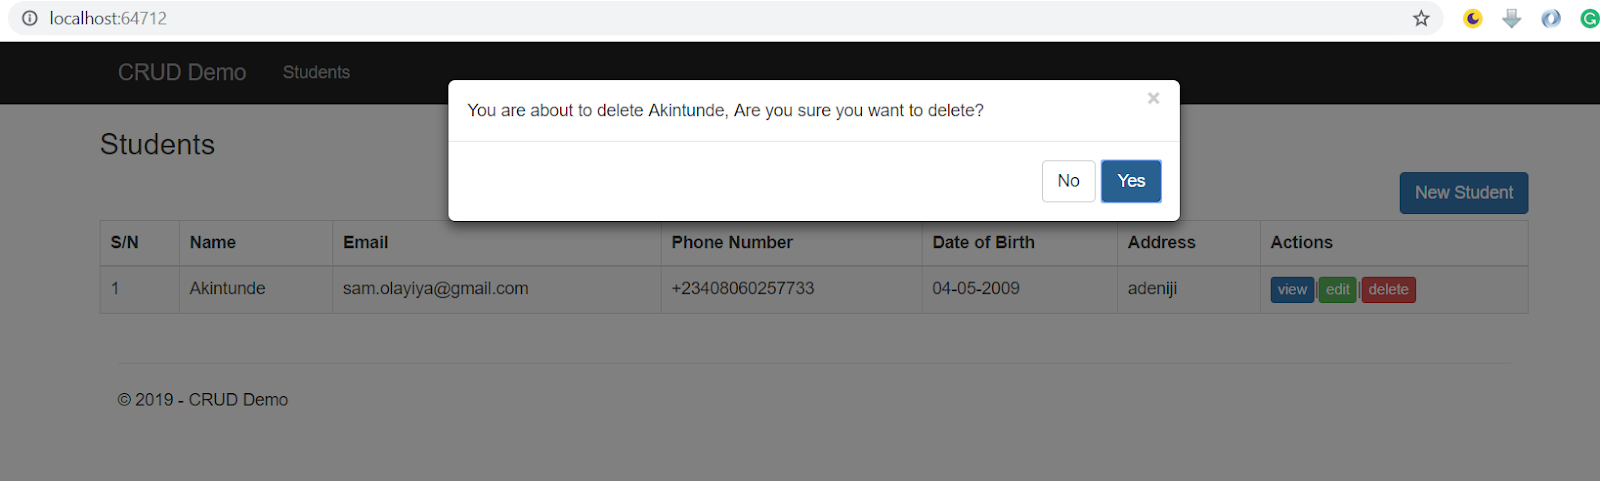
Save all changes, build and run the solution, on the index page, try to delete a student record. We need a confirmation dialog before delete, to achieve this we are going to add BootboxJS plugin to the project. To integrate bootbox, download the minified version of bootboxJs from http://bootboxjs.com/. Add this file into the content folder in the project. Next is to reference this file in the script section on the index page as shown
@section Scripts{
}
Modify the deleteStudentfn, add bootbox confirmation dialogue as shown
function deleteStudentfn(id, name) {
        bootbox.confirm({
            message: "You are about to delete " + name + ", Are you sure you want to delete?",
            buttons: {
                cancel: {
                    label: 'No'
                },
                confirm: {
                    label: 'Yes'
                }
            },
            callback: function (result) {
                if (result) {
                    $("#student_delete_id").val(id);
                    $("#deleteStudentForm").submit();
                }
            }
        });
    }
Save all changes, build and run the solution. Click on delete button, you will see a confirmation dialog with yes or no button with a warning message. Click yes to proceed with record deletion or no to cancel the operation.

In the next tutorial, we are going to add paging, sorting and filtering functionality to the student record table.
Download Complete Source Code
I hope this tutorial is helpful. If you have any question or contribution, you can drop your comment or contact me using the contact form.
Download Complete Source Code
< Previous Next Article >
For more information on BootBoxJs, visit http://bootboxjs.com/. You can also read through their documentation at http://bootboxjs.com/documentation.html.
We have been able to implement basic crud operation in asp.net MVC. We started by adding a data access layer using database first approach. We then created an index page to list all students. Next, we added create functionality where a new student can be added to the collection of the student. Next, we implement view, edit and delete operation. We now wrap it all by integrating bootboxJs.
In the next tutorial, we are going to add paging, sorting and filtering functionality to the student record table.
Download Complete Source Code
I hope this tutorial is helpful. If you have any question or contribution, you can drop your comment or contact me using the contact form.
Download Complete Source Code
< Previous Next Article >
Implementing CRUD Operation With Entity Framework in Asp.net MVC: Part III
 Reviewed by Akintunde Toba
on
March 13, 2019
Rating:
Reviewed by Akintunde Toba
on
March 13, 2019
Rating:
Reviewed by Akintunde Toba
on
March 13, 2019
Rating:


No comments: